

How to Create a Polkadot Account
If you're looking to store your DOT safely, there are several recommended wallets available. These range from more advanced options to user-friendly products made by the community for the community.
This article will guide you through creating a Polkadot account using the battle-tested Polkadot Developer Signer. However, for newcomers, opting for any of the user-friendly wallets is strongly advised. These wallets offer the same functionalities and security standards but present them in a more approachable interface.
User-friendly wallets
Section titled “User-friendly wallets”On the wallet options page, you can find articles about some wallets well-regarded by the community, describing some of their basic features like creating an account, receiving and sending funds, staking, etc.
The following articles guide you through the process of creating a Polkadot account using these user-friendly wallets:
- Talisman Wallet: How to Create an Account
- Nova Wallet: How to Create an Account
- Subwallet: How to Create an Account
- PolkaGate: How to Create an Account
Hardware wallets
Section titled “Hardware wallets”By creating your Polkadot account using a hardware wallet, you would take advantage of the highest security standards in the industry to store your assets while you can still access and use your Polkadot account whenever you wish.
Here are two articles on how to create your account in Polkadot Vault (rebranding from Parity Signer) and Ledger:
Wallet for advanced users
Section titled “Wallet for advanced users”The following wallets are oriented toward developers and advanced users :
- Polkadot Developer Signer - This is the wallet covered in this article
- Polkadot Developer Interface
- Subkey (needs technical knowledge)
How to create an account with the Polkadot Developer Signer
Section titled “How to create an account with the Polkadot Developer Signer”No matter the type of your account, add your accounts through a browser extension, as it has many advantages:
- You can use your accounts with any compatible app in the ecosystem, not just the Polkadot Developer Interface.
- It provides better security than using a web UI directly.
- Your browser won't "forget" your accounts if its cookies are cleared.
1. Install the Polkadot Developer Signer. It is available for both Google Chrome (and Chromium-based browsers like Brave) and Firefox.
2. After installing the extension, you should see the orange and white Polkadot Developer Signer logo in your browser's menu bar. If you don't, click on the little puzzle icon to pin it. Then click it to open the extension:
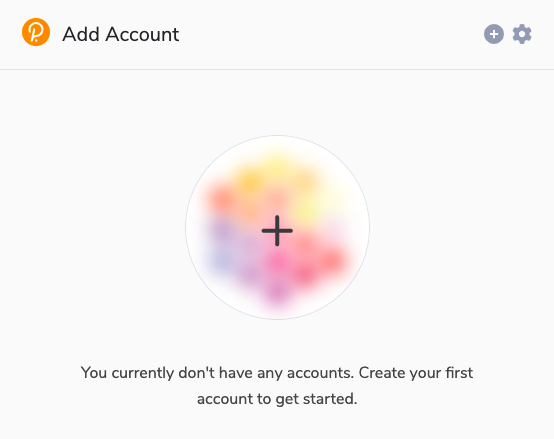
3. Click the big plus button, or select "Create new account" from the small plus icon in the top right.
4. A new mnemonic phrase of twelve words will be generated for you. Make sure tosave the mnemonic phrase safely now, as there is no way to view it after the account is created.
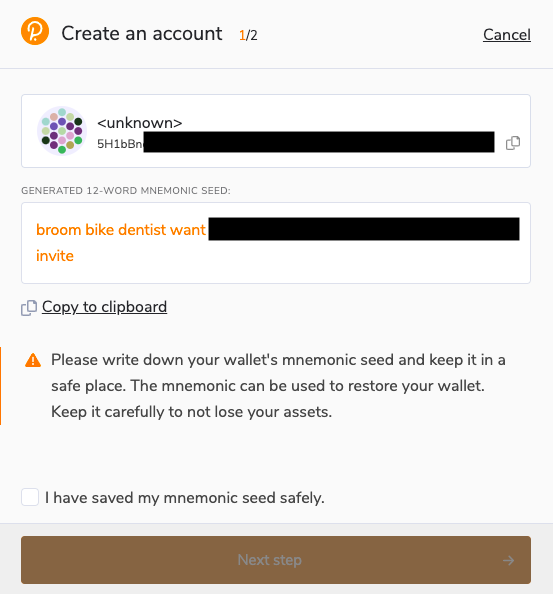
5. Once you have saved your mnemonic phrase, mark that you have saved it safely and proceed to the next step.
6. Give your account a descriptive name. It's for your use only and won't be visible to other users.
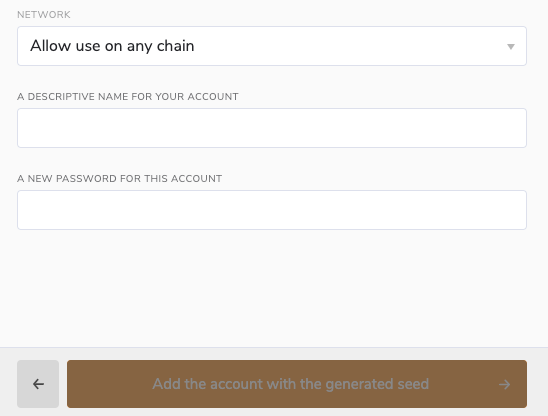
7. Set a password for your account. You'll need to enter this password when signing any transaction with your account, like sending funds out. Use only Latin letters, numbers, and symbols. It's important you remember your password. There is no way to recover it later.
8. Confirm your password and add the account.
You're all set. Refresh the Accounts page on the Polkadot Developer Interface and you should see your account.
To see the whole process of creating an account using the Polkadot Developer Signer, please watch this video tutorial.
Create an Account using Polkadot Developer Signer